HTML: The Living Standard
Edition for Web Developers — Last Updated 13 July 2026
Edition for Web Developers — Last Updated 13 July 2026
Support in one engine only.
Support in all current engines.
すべてのはhiddenコンテンツ属性設定を持ってもよい。属性は、次のキーワードと状態を持つである:
| キーワード | 状態 | 概要 |
|---|---|---|
hidden | 非表示 | レンダリングされない。 |
until-found | Hidden Until Found | レンダリングされないが、 およびで内部のコンテンツにアクセスできる。 |
The attribute's missing value default is the Not Hidden state, and its invalid value default and empty value default are both the state.
要素が状態の属性を持つ場合、それは、その要素がまだないこと、もしくはもはやページの現在の状態には直接関係がない、または、ユーザーが直接アクセスするのとは対照的に、ページの他の部分で再利用するコンテンツを宣言するために使用されていることを示す。ユーザーエージェントは、状態にある要素をレンダリングすべきでない。
要素がにある属性を持つ場合、その要素は状態のように非表示になっているが、要素内のコンテンツはおよびにアクセスできることを示す。When these features attempt to scroll to a target which is in the element's subtree, the user agent will remove the attribute in order to reveal the content before scrolling to it by running the ancestor revealing algorithm on the target node.
この属性は通常CSSを使用して実装されているため、CSSを使用して上書きすることもできる。たとえば、'display: block'をすべての要素に適用する規則は、状態の影響を相殺するだろう。したがって著者は、期待通りに属性がスタイル付けされていることを確認し、そのスタイルシートを書くときに注意する必要がある。さらに、状態をサポートしないレガシーユーザーエージェントは、'content-visibility: hidden'ではなく'display: none'になるため、著者はスタイルシートが要素の'display'または'content-visibility'プロパティを変更しないようにすることを勧める。
状態に属性をもつ要素は、'display: none'ではなく'content-visibility: hidden'を使用するため、状態には、状態Dとは異なる2つの注意点が存在する:
ページ内検索で表示するには、要素がの影響を受ける必要がある。 これは、状態の要素が'none'、'contents'、または'inline'の'display'値を持つ場合、その要素はページ内検索によって表示されないことを意味する。
状態の場合、要素は依然としてがある。これはつまり、ボーダー、マージン、およびパディングは要素の周囲にレンダリングされたままになる。
次の骨格の例において、属性は、ユーザーがログインするまでウェブゲームのメイン画面を非表示にするために使用される:
< h1 > The Example Game</ h1 >
< section id = "login" >
< h2 > Login</ h2 >
< form >
...
<!-- calls login() once the user's credentials have been checked -->
</ form >
< script >
function login() {
// switch screens
document. getElementById( 'login' ). hidden = true ;
document. getElementById( 'game' ). hidden = false ;
}
</ script >
</ section >
< section id = "game" hidden >
...
</ section > 属性は、別のプレゼンテーションに合法的に示すことができたコンテンツを隠すために使用されてはならない。たとえば、タブ付きインターフェイスは単にオーバーフロープレゼンテーションの一種であるため、タブ付きダイアログでパネルを隠すためにを使用することは誤りである。―それはスクロールバーをもつ1つの大きなページ内のすべてのフォームコントロールを示すのと同様である。ちょうど1つのプレゼンテーションからコンテンツを非表示にするためにこの属性を使用することも同様に誤りである。―何かがとマークされる場合、それは、たとえばスクリーンリーダーなどを含む、すべてのプレゼンテーションから隠されている。
自身がでない要素は、である要素へされてはならない。自身がでないおよび要素のfor属性も同様に、である要素を参照してはならない。どちらの場合も、このような参照はユーザーの混乱を引き起こすだろう。
しかし、要素およびスクリプトは、他のコンテキストでである要素を参照してもよい。
たとえば、属性でマークされたセクションにリンクする属性を使用するのは誤りだろう。コンテンツが適切または関連しない場合、それにリンクする理由はない。
しかし、自身がである説明を参照するために、ARIA 属性を使用することは構わない。説明を非表示にすることはそれらが単独で有用でないことを意味する一方で、それらは、それらが説明する要素から参照される特定のコンテキストにおいて有用である方法で記述することもできる。
同様に、属性を持つ要素は、オフスクリーンバッファーとしてスクリプト化されたグラフィックスエンジンによって使用されるかもしれず、フォームコントロールは、属性を使用する隠し要素を参照するかもしれない。
属性によって非表示にされたセクション内の要素は依然としてアクティブである。たとえば、そのようなセクションでのスクリプトやフォームコントロールは、依然として実行および送信する。それらのプレゼンテーションのみがユーザーに変更される。
作成時の初期値を含む、トラバース可能なナビゲート可能のシステム可視状態は、ユーザー エージェントによって決定される。たとえば、ブラウザーウィンドウが最小化されているか、ブラウザータブが現在バックグラウンドにあるか、またはタスクスイッチャーなどのシステム要素がページを覆い隠しているかどうかを表す。
When a user agent determines that the system visibility state for traversable navigable traversable has changed to newState, it must run the following steps:
Let navigables be the inclusive descendant navigables of traversable's active document.
For each navigable of navigables in what order?:
Let document be navigable's active document.
Queue a global task on the user interaction task source given document's relevant global object to update the visibility state of document with newState.
Documentは可視状態を持ち、これは"hidden"または"visible"のいずれかで、最初は"hidden"に設定される。
Support in all current engines.
Support in all current engines.
To update the visibility state of Document document to visibilityState:
If document's visibility state equals visibilityState, then return.
Set document's visibility state to visibilityState.
Queue a new VisibilityStateEntry whose visibility state is visibilityState and whose timestamp is the current high resolution time given document's relevant global object.
Run the screen orientation change steps with document. [SCREENORIENTATION]
Run the view transition page visibility change steps with document.
Run any page visibility change steps which may be defined in other specifications, with visibility state and document.
It would be better if specification authors sent a pull request to add calls from here into their specifications directly, instead of using the page visibility change steps hook, to ensure well-defined cross-specification call order. As of the time of this writing the following specifications are known to have page visibility change steps, which will be run in an unspecified order: Device Posture API and Web NFC. [DEVICEPOSTURE] [WEBNFC]
Fire an event named visibilitychange at document, with its bubbles attribute initialized to true.
To set the initial visibility state of Document document to visibilityState:
Set document's visibility state to visibilityState.
Queue a new VisibilityStateEntry whose visibility state is document's visibility state and whose timestamp is 0.
VisibilityStateEntryインターフェイスSupport in one engine only.
VisibilityStateEntryインターフェイスは、文書がアクティブになった瞬間から、文書の可視性の変更を公開する。
function wasHiddenBeforeFirstContentfulPaint() {
const fcpEntry = performance. getEntriesByName( "first-contentful-paint" )[ 0 ];
const visibilityStateEntries = performance. getEntriesByType( "visibility-state" );
return visibilityStateEntries. some( e =>
e. startTime < fcpEntry. startTime &&
e. name === "hidden" );
} ページを非表示にすると、レンダリングおよびその他のユーザエージェント操作のスロットリングが発生する可能性があるため、そのようなスロットリングが発生したことを示すものとして、可視の変更を使用するのが一般的である。ただし、長時間の非アクティブ状態など、他の要因によっても、さまざまなブラウザーでスロットリングが発生する可能性がある。
VisibilityStateEntryは、関連付けられたDOMHighResTimeStampタイムスタンプを持つ。
VisibilityStateEntryは、関連付けられた"visible"または "hidden"可視状態を持つ。
entryTypeゲッターステップは、"visibility-state"を返す。
durationゲッターステップは0を返す。
同じ名前の属性の説明については、inertも参照のこと。
ノード(特に要素およびテキストノード)は不活性である可能性がある。ノードが不活性である場合:
ヒットテストは、あたかも'pointer-events' CSSプロパティが'none'に設定されているかのように動作しなければならない。
テキスト選択機能は、あたかも'user-select' CSSプロパティが'none'に設定されているかのように動作しなければならない。
編集可能である場合、ノードはあたかも編集不可能であるかのように動作する。
ユーザーエージェントは、ページ内検索の目的でノードを無視すべきである。
通例、不活性ノードにフォーカスを当てることはできず、ユーザーエージェントは非活性ノードをアクセシビリティAPIまたは支援技術に公開しない。コマンドである不活性ノードは、上記の方法ではユーザーには使用不能となる。
いずれにせよ、ユーザーエージェントは、ページ内検索およびテキスト選択の制限をユーザーが上書き可能にしてもよい。
デフォルトでは、ノードは不活性ではない。
subjectがdocumentの最上位レイヤーの一番上のdialog要素である場合、Document documentはモーダルダイアログボックスによってブロックされるsubjectである。documentがそのようにブロックされる一方で、documentに接続されているすべてのノードは、subject要素とそのフラットツリーの子孫を除き、不活性とマークされなければならない。
subjectは、inert属性を介してさらに不活性になることができるが、subject自体に指定されている場合に限る(つまり、subjectは祖先の不活性を回避する)。subjectのフラットツリーの子孫は、同じように不活性になることがある。
dialog要素のshowModal()メソッドは、dialog要素をノード文書の最上位レイヤーに追加することによって、このメカニズムをトリガーさせる。
inert属性Support in all current engines.
inert属性は、その存在によって、(モーダルダイアログなど)他の方法では不活性化を免れない要素およびそのすべてのフラットツリーの子孫がユーザーエージェントによって不活性にされることを示す真偽属性である。
不活性サブツリーは、不活性状態ではないページの外観を理解または使用するために重要なコンテンツまたはコントロールを含むべきでない。不活性サブツリー内のコンテンツは、すべてのユーザーによって認識できる、またはインタラクティブではない。著者は、要素が表す内容が何らかの形で視覚的に隠されていない限り、要素を不活性と指定すべきでない。ほとんどの場合、著者は個々のフォームコントロールにinert属性を指定すべきでない。このような場合は、disabled属性の方がおそらく適切である。
次の例は、"loading"メッセージによって視覚的に隠されている、部分的に読み込まれたコンテンツを不活性としてマークする方法を示す。
< section aria-labelledby = s1 >
< h3 id = s1 > Population by City</ h3 >
< div class = container >
< div class = loading >< p > Loading...</ p ></ div >
< div inert >
< form >
< fieldset >
< legend > Date range</ legend >
< div >
< label for = start > Start</ label >
< input type = date id = start >
</ div >
< div >
< label for = end > End</ label >
< input type = date id = end >
</ div >
< div >
< button > Apply</ button >
</ div >
</ fieldset >
</ form >
< table >
< caption > From 20-- to 20--</ caption >
< thead >
< tr >
< th > City</ th >
< th > State</ th >
< th > 20-- Population</ th >
< th > 20-- Population</ th >
< th > Percentage change</ th >
</ tr >
</ thead >
< tbody >
<!-- ... -->
</ tbody >
</ table >
</ div >
</ div >
</ section > 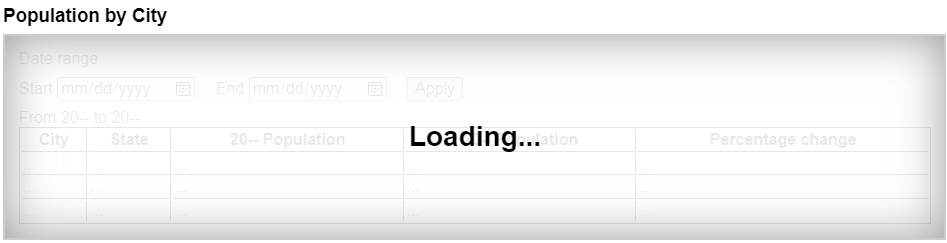
"loading"のオーバーレイは、不活性のコンテンツを覆い隠し、不活性のコンテンツが現在アクセス可能でないことを視覚的に明らかにする。見出しおよび"loading"のテキストは、inert属性をもつ要素の子孫ではないことに注意する。これは、このテキストがすべてのユーザーをアクセス可能にするが、不活性のコンテンツは誰も操作できなくなる。
デフォルトでは、要素またはそのサブツリーが不活性であることを示す永続的な視覚的表示は存在しない。そのようなコンテンツに適切な視覚的なスタイルは、多くの場合、コンテキストに依存する。例えば、不活性な画面外のナビゲーションパネルは、その画面外の位置がコンテンツを視覚的にさえぎるので、デフォルトスタイルを必要としない。同様に、モーダルdialog要素のbackdropは、ウェブページの不活性なコンテンツを具体的にスタイル設定するのではなく、視覚的にさえぎる手段として機能する。
しかし、他の多くの状況では、ユーザーの混乱を避けるために、著者は文書のどの部分がアクティブで、どの部分が不活性であるかを明確にマークすることが強く勧める。特に、すべてのユーザーがページのすべての部分を一度に表示できるわけではないことを覚えておく価値がある。 たとえば、スクリーンリーダーのユーザー、小型のデバイスや拡大鏡を使用しているユーザー、特に小さなウィンドウを使用しているユーザーでさえ、ページのアクティブな部分を見ることができず、不活性なセクションが明らかに不活性でない場合はフラストレーションを感じる可能性がある。
ユーザーに迷惑となる可能性がある特定のAPI(ポップアップを開く、振動する電話など)の悪用を防ぐために、ユーザーエージェントは、ユーザーがウェブページをアクティブに操作している、または少なくとも1回はページを操作した場合にのみ、これらのAPIを許可する。この"アクティブな相互作用"の状態は、この節で定義されたメカニズムを通じて維持される。
ユーザーのアクティブ化に依存するAPIは、さまざまなレベルに分類される:
このAPIは、定着したアクティブ化状態がtrueである必要があるため、最初のユーザーによるアクティブ化までブロックされる。
このAPIは、一時的なアクティブ化状態がtrueであることを必要とするが、それを消費しないため、一時的な状態が期限切れになるまで、ユーザーによるアクティブ化ごとに複数の呼び出しが許可される。
このAPIは、一時的なアクティブ化状態がtrueであることを必要とし、ユーザーによるアクティブ化ごとの複数の呼び出しを防ぐために、各呼び出しでユーザーによるアクティブ化を消費する。
このAPIは、履歴アクションのアクティブ化状態がtrueであることを要求し、ユーザーアクティブ化ごとに複数のコールが発生するのを防ぐために、各コールで履歴アクションのアクティブ化を消費する。
UserActivationインターフェイス各Windowは、関連付けられたUserActivationを持ち、これはUserActivationオブジェクトである。Windowオブジェクトの作成時に、関連するUserActivationをWindowオブジェクトの関連領域で作成された新しいUserActivationオブジェクトに設定しなければならない。
navigator..hasBeenActiveウィンドウがスティッキーアクティベーションを持つかどうかを返す。
navigator.userActivation.isActiveウィンドウが一時的にアクティベーションを持つかどうかを返す。
HTMLの特定の要素は、ユーザーがアクティブにすることができることを意味する、アクティブ化動作を持つ。これは、常にclickイベントによって発生する。
element.click()あたかも要素をクリックされたかのように動作する。
ToggleEventインターフェイスevent.oldStateSupport in all current engines.
クローズからオープンに遷移する場合は"closed"に設定し、オープンからクローズに遷移する場合は"open"に設定する。
event.newStateSupport in all current engines.
クローズからオープンに遷移する場合は"open"に設定し、オープンからクローズに遷移する場合は"closed"に設定する。
event.source切り替えを開始したエレメントに設定する。これは、popovertargetおよびcommandfor属性で設定できる。ソース要素がない場合、nullに設定される。
oldStateおよびnewState属性は、初期化された値を返さなければならない。
The source getter steps are to return the result of retargeting source against this's currentTarget.
DOM standard issue #1328 tracks how to better standardize associated event data in a way which makes sense on Events. Currently an event attribute initialized to a value cannot also have a getter, and so an internal slot (or map of additional fields) is required to properly specify this.
toggle task trackerは、次のような構造体である:
ToggleEventを発火するタスク。oldState属性のタスクのイベントの値を表す文字列。CommandEventインターフェイスevent.command要素が実行できるアクションを返す。
event.sourceこのイベントを発生させるために相互作用したElementを返す。
command属性は、初期化された値を返さなければならない。
The source getter steps are to return the result of retargeting source against this's currentTarget.
DOM standard issue #1328 tracks how to better standardize associated event data in a way which makes sense on Events. Currently an event attribute initialized to a value cannot also have a getter, and so an internal slot (or map of additional fields) is required to properly specify this.
HTMLユーザーインターフェイスは典型的に、フォームコントロール、スクロール可能領域、リンク、ダイアログボックス、ブラウザータブなど、複数の対話的なウィジットから成る。これらウィジェットは、他(たとえば、リンク、フォームコントロール)を含むもの(たとえば、ブラウザータブ、ダイアログボックス)をもつ、階層構造を形成する。
キーボードを使用するインターフェイスと情報交換する場合、アクティブなウィジェットから、フォーカスされると呼ばれる、対話的なウィジェットの階層構造を通して、キー入力はシステムから流れる。
グラフィカル環境で動作するブラウザータブにおいて動作するHTMLアプリケーションを考えてみる。このアプリケーションが、いくつかのテキストコントロールおよびリンクをもつページを持ち、それ自身がテキストコントロールとボタンを持った、モーダルダイアログを表示していると想定する。
このシナリオにおいて、その子の間でHTMLアプリケーションを含むブラウザータブを持つだろう、フォーカス可能なウィジェットの階層構造は、ブラウザーウィンドウを含むかもしれない。タブ自身は、ダイアログと同様に、その子として、様々なリンクおよびテキストコントロールを持つだろう。ダイアログ自身は、その子として、テキストコントロールおよびボタンを持つだろう。
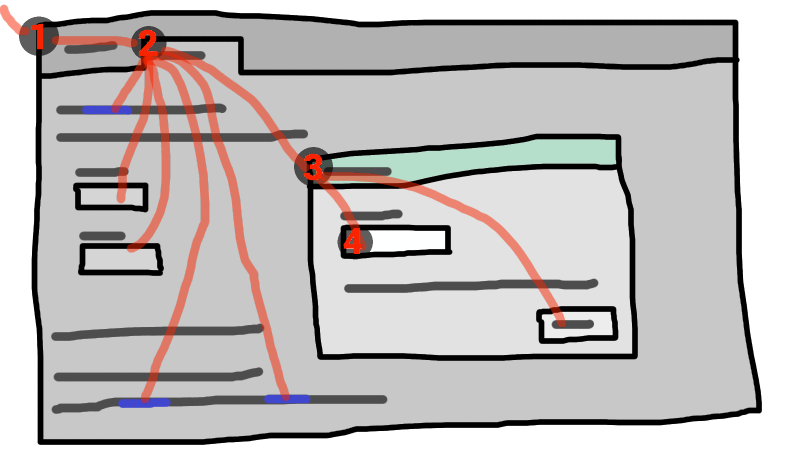
この例でフォーカスをもつウィジェットがダイアログボックスでテキストコントロールであった場合、キー入力は、グラフィカルシステムから①ウェブブラウザー、②タブ、③ダイアログ、そして最後に④テキストコントロールへ流される。
キーボードイベントは、常にこのフォーカスされた要素で対象にされる。
トップレベルトラバーサブルは、オペレーティングシステムからチャネルされたキーボード入力(おそらくアクティブな文書の子孫ナビゲート可能の1つがターゲット)を受け取ることができる場合、システムフォーカスを持つ。
トップレベル横断可能は、そのシステム可視状態が"visible"である場合、 ユーザーアテンションを持ち、そしてシステムフォーカスを持つか、またはそれに直接関連するユーザーエージェントウィジェットが、オペレーティングシステムから送られたキーボード入力を受け取ることができるかのいずれかである。
ブラウザーウィンドウがフォーカスを失うと、ユーザーアテンションは失われるが、一方でシステムのフォーカスもまた、ロケーションバーなど、ブラウザーウィンドウ内の他のシステムウィジェットを失われる可能性がある。
Document dは、dが完全にアクティブであり、かつdのノートナビゲート可能のトップレベル横断可能に ユーザーアテンションがある場合、ユーザーアテンションをもつトップレベル横断可能の完全にアクティブの子孫である。
用語フォーカス可能領域は、そのようなキーボード入力の対象になる可能性があるインターフェイスの領域を指すために使用される。フォーカス可能領域は、要素、要素の一部、またはユーザーエージェントによって処理される他の領域となることができる。
各フォーカス可能領域は、DOMでフォーカス可能領域の位置を表すNodeオブジェクトである、DOMアンカーを持つ。(フォーカス可能領域がNode自身である場合、それはそれ自身のDOM anchorである。)フォーカス可能領域を表すために他のDOMオブジェクトが存在しない場合、DOMアンカーは、フォーカス可能領域に適するようないくつかのAPIで使用される。
次のテーブルは、どのオブジェクトがフォーカス可能領域となることができるかを説明する。左の列におけるセルは、フォーカス可能領域となることができるオブジェクトを説明する。右の列におけるセルは、この要素に対するDOMアンカーを説明する。(両方の列をまたぐセルは、非規範的な例である。)
| フォーカス可能領域 | DOMアンカー |
|---|---|
| 例 | |
次のすべての基準を満たす要素:
| 要素自身。 |
| |
レンダリングされているおよび不活性でないimg要素に関連するイメージマップにおけるarea要素の形状。 | img要素 |
次の例において、それぞれ画像の、 | |
| 要素のサブウィジェットを提供されるユーザーエージェントは、レンダリングされているかつ実際に無効または不活性でない。 | フォーカス可能領域がサブウィジェットとなる要素。 |
| |
| レンダリングされているかつ不活性でない要素のスクロール可能な領域。 | スクロール可能な領域のスクロールが作成されたボックスに対する要素 |
CSS 'overflow'プロパティの'scroll'値が典型的にスクロール可能領域を作成する。 | |
非nullのブラウジングコンテキストがあり、不活性ではないDocumentのビューポート。 | ビューポートが作成されたDocument。 |
| |
| 特にアクセシビリティを支援するために、またはプラットフォームの規則によりよく一致させるために、ユーザーエージェントによってフォーカス可能な領域であると判断される他の要素または要素の一部。 | 要素。 |
ユーザーエージェントは、すべてのリストアイテムの箇条書きをシーケンシャルにフォーカス可能にして、その結果ユーザーがリストをより簡単にナビゲートできるようにすることができる。 同様に、ユーザーエージェントは、 | |
A navigable container (e.g. an iframe) is a focusable area, but key events routed to a navigable container get immediately routed to its content navigable's active document. Similarly, in sequential focus navigation a navigable container essentially acts merely as a placeholder for its content navigable's active document.
各Documentの1つのフォーカス可能な領域は、文書のフォーカスされた領域として指定される。どのコントロールがそのように呼ばれるかは時間とともに変化し、この仕様におけるアルゴリズムに基づく。
たとえ文書が完全にアクティブでなくかつユーザーに表示されないとしても、文書のフォーカスされた領域を保持できる。文書の完全にアクティブな状態が変化しても、文書のフォーカスされた領域は同じままとなる。
The currently focused area of a top-level traversable traversable is the focusable area-or-null returned by this algorithm:
If traversable does not have system focus, then return null.
Let candidate be traversable's active document.
While candidate's focused area is a navigable container with a non-null content navigable: set candidate to the active document of that navigable container's content navigable.
If candidate's focused area is non-null, set candidate to candidate's focused area.
candidateを返す。
The current focus chain of a top-level traversable traversable is the focus chain of the currently focused area of traversable, if traversable is non-null, or an empty list otherwise.
An element that is the DOM anchor of a focusable area is said to gain focus when that focusable area becomes the currently focused area of a top-level traversable. When an element is the DOM anchor of a focusable area of the currently focused area of a top-level traversable, it is focused.
tabindex属性Support in all current engines.
tabindexコンテンツ属性は、著者が、DOMアンカーとして要素を持つ要素および領域をフォーカス可能領域にする、シーケンシャルフォーカス可能にすることを許可または防止する、ならびにシーケンシャルフォーカスナビゲーションの相対的な順序を決定することを可能にする。
名前"tab index"は、フォーカス可能な要素を通してナビゲートするためのTabキーの一般的な使用方法に由来する。"tabbing"(タブ移動)という用語は、シーケンシャルフォーカス可能なフォーカス可能領域を前に進めることを指す。
tabindex属性が指定される場合、妥当な整数である値を持たなければならない。正の数値は、要素のフォーカス可能領域の相対的な位置をシーケンシャルフォーカスナビゲーション順序で指定し、負の数値はコントロールがシーケンシャルフォーカス可能でないことを示す。
0または-1以外の値を使用している場合、開発者は、これが正しく行うために複雑になるよう、自身のtabindex属性に対して用心すべきである。
以下に、可能なtabindex属性値の動作の概要を提供する。
tabindex属性値がより大きい要素は後から来る。tabindex属性は、要素をフォーカス不可にするために使用できないことに注意する。ページ著者ができる唯一の方法は、要素を無効にする、または要素を不活性にすることである。
documentOrShadowRoot.activeElementキーイベントがルーティングされるdocumentOrShadowRoot内の最も深い要素を返す。大まかにいって、これは文書におけるフォーカスされた要素である。
このAPIために、子ナビゲート可能がフォーカスされるとき、そのコンテナーは親のアクティブな文書内でフォーカスされる。 たとえば、ユーザーがiframeでフォーカスをテキストコントロールに移動する場合、iframeはiframeのnode documentにおいてactiveElement APIによって返される要素である。
同様に、フォーカスされた要素がdocumentOrShadowRootとは異なるノードツリーにあるとき、documentOrShadowRootがフォーカスされた要素のシャドウを含む包含祖先である場合、返される要素はdocumentOrShadowRootと同じノードツリーにあるホストになり、そうでない場合はnullになる。
document.hasFocus()キーイベントがdocumentを経由またはルーティングされている場合はtrueを返し、そうでなければfalseを返す。大まかにいって、これはフォーカスされているdocument、またはdocument内にネストされた文書に対応する。
window.focus()windowのナビゲート可能なフォーカスを移動する。
element.focus()element.focus({ preventScroll, focusVisible })フォーカスをelementに移動する。
elementがナビゲート可能なテキストコンテナーである場合、代わりにナビゲート可能なコンテンツにフォーカスを移動する。
デフォルトでは、このメソッドもelementをビューにスクロールする。preventScrollオプションを指定してtrueに設定すると、この動作が防止される。
デフォルトでは、ユーザーエージェント実装で定義されたヒューリスティックを使用して、フォーカスリングを介してフォーカスを示すかどうかを決定する。focusVisibleオプションを指定してtrueに設定すると、フォーカスリングが常に表示される。
element.blur()フォーカスをビューポートに移動する。このメソッドの使用は奨められない。ビューポートにフォーカスしたい場合、Documentの文書要素上のfocus()メソッドを呼び出す。
見苦しいフォーカスリングを発見する場合、フォーカスリングを非表示にするためにこの方法を使用してはならない。代わりに、'outline'プロパティを上書きするために:focus-visible疑似クラスを使用し、要素がフォーカスされるものを表示する別の方法を提供する。代替フォーカススタイルが利用可能にならないか、ページが主にキーボードを使用してページをナビゲートする人に対して著しく使用可能にならないか、ページをナビゲートするのに役立つフォーカスアウトラインを使う人の視覚を減少させないかどうかに注意する。
たとえば、textarea要素からアウトラインを隠し、代わりにフォーカスを示すために黄色の背景を使用するために、次を使うことができる:
textarea:focus-visible { outline : none; background : yellow; color : black; } autofocus属性autofocusコンテンツ属性は、著者にページがロードされるとすぐに要素にフォーカスされることを示すのを可能にし、ユーザーは重要な要素に手動でフォーカスすることなく入力を開始できる。
popover属性が設定されているdialog要素またはHTML要素内部の要素にautofocus属性が指定される場合、ダイアログまたはポップオーバーが表示されたときにフォーカスされる。
To find the nearest ancestor autofocus scoping root element given an Element element:
If element is a dialog element, then return element.
If element's popover attribute is not in the No Popover state, then return element.
Let ancestor be element.
While ancestor has a parent element:
Set ancestor to ancestor's parent element.
If ancestor is a dialog element, then return ancestor.
If ancestor's popover attribute is not in the No Popover state, then return ancestor.
Return ancestor.
両方がautofocus属性を指定される同じ直近の祖先オートフォーカス範囲のルート要素をもつ2つの要素が存在してはならない。
次の断片において、文書が読み込まれるとき、テキストコントロールにフォーカスされる。
< input maxlength = "256" name = "q" value = "" autofocus >
< input type = "submit" value = "Search" > autofocus属性は、フォームコントロールだけでなく、すべての要素に適用される。 これにより、次のような例が可能になる:
< div contenteditable autofocus > Edit < strong > me!</ strong >< div > アクティブにされるまたはフォーカスさせることができる各要素はaccesskey属性を使用して、それをアクティブにするための単一のキーの組み合わせを割り当てることができる。
正確なショートカットは、ユーザーエージェントによって決定され、ユーザーのキーボードに関する情報に基づき、どのキーボードショートカットが既にプラットフォーム上に存在し、他にどのようなショートカットがページ上で指定され、ガイドとしてaccesskey属性に提供された情報を使用する。
関連するキーボードショートカットが多種多様な入力デバイスで利用可能であることを確実にするために、著者はaccesskey属性で多数の選択肢を提供できる。
各選択肢は、文字または数字のような、単一の文字で構成される。
ユーザーエージェントは、キーボードショートカットの一覧をユーザーに提供できるが、著者は行うことも推奨される。accessKeyLabel IDL属性は、ユーザーエージェントによって割り当てられた実際のキーの組み合わせを表す文字列を返す。
この例において、著者はショートカットキーを使用して呼び出すことができるボタンを提供してきた。フルキーボードをサポートするために、著者は可能なキーとして"C"を提供している。テンキーのみを搭載したデバイスをサポートするために、著者は別の可能なキーとして"1"を提供している。
< input type = button value = Collect onclick = "collect()"
accesskey = "C 1" id = c > To tell the user what the shortcut key is, the author has here opted to explicitly add the key combination to the button's label:
function addShortcutKeyLabel( button) {
if ( button. accessKeyLabel != '' )
button. value += ' (' + button. accessKeyLabel + ')' ;
}
addShortcutKeyLabel( document. getElementById( 'c' )); 異なるプラットフォーム上のブラウザーは、たとえ同じキーの組み合わせであっても、そのプラットフォーム上で普及している規則に基づいて異なるラベルを表示する。たとえば、キーの組み合わせが、Controlキー、Shiftキー、および文字Cである場合、Macのブラウザーが"^⇧C"を表示するかもしれない一方で、Windowsのブラウザーは"Ctrl+Shift+C"を表示するかもしれない。一方でEmacsのブラウザーは単に"C-C"を表示するかもしれない。同様に、キーの組み合わせがAltキーとEscキーである場合、Windowsは"Alt+Esc"を使用するかもしれず、Macは"⌥⎋"を使用するかもしれず、Emacsのブラウザーは、"M-ESC"または"ESC ESC"を使用するかもしれない。
したがって、一般に、accessKeyLabel IDL属性から返された値を解析しようとするのは賢明ではない。
accesskey属性Support in all current engines.
すべてのHTML要素は、accesskeyコンテンツ属性の設定を持ってもよい。accesskey属性値は、要素をアクティブにするまたはフォーカスするキーボードショートカットを作成するためのガイドとして、ユーザーエージェントによって使用される。
指定される場合、値は、順序付きの一意な空白区切りトークンの集合でなければならない。これらのトークンはいずれも別のトークンと同一でなく、それぞれが正確に1コードポイント長さでなければならない。
次の例において、サイトを熟知するキーボードユーザーがより迅速に関連するページに移動できるよう、さまざまなリンクがアクセスキーとともに与えられる:
< nav >
< p >
< a title = "Consortium Activities" accesskey = "A" href = "/Consortium/activities" > Activities</ a > |
< a title = "Technical Reports and Recommendations" accesskey = "T" href = "/TR/" > Technical Reports</ a > |
< a title = "Alphabetical Site Index" accesskey = "S" href = "/Consortium/siteindex" > Site Index</ a > |
< a title = "About This Site" accesskey = "B" href = "/Consortium/" > About Consortium</ a > |
< a title = "Contact Consortium" accesskey = "C" href = "/Consortium/contact" > Contact</ a >
</ p >
</ nav > 次の例において、検索フィールドは2つの可能なアクセスキー、"s"と"0"(この順番で)が与えられる。テンキー付きの小さなデバイス上のユーザーエージェントは単なる簡素なキー0を選ぶかもしれないが、フルキーボードを搭載したデバイスでのユーザーエージェントは、ショートカットキーとしてCtrl + Alt + Sを選ぶかもしれない:
< form action = "/search" >
< label > Search: < input type = "search" name = "q" accesskey = "s 0" ></ label >
< input type = "submit" >
</ form > 次の例において、ボタンは説明可能なアクセスキーを持つ。このスクリプトは次に、ユーザーエージェントが選択したキーの組み合わせを通知するためにボタンのラベルの更新を試みる。
< input type = submit accesskey = "N @ 1" value = "Compose" >
...
< script >
function labelButton( button) {
if ( button. accessKeyLabel)
button. value += ' (' + button. accessKeyLabel + ')' ;
}
var inputs = document. getElementsByTagName( 'input' );
for ( var i = 0 ; i < inputs. length; i += 1 ) {
if ( inputs[ i]. type == "submit" )
labelButton( inputs[ i]);
}
</ script > あるユーザーエージェントにおいて、ボタンのラベルは"Compose(⌘N)"になるかもしれない。別のものにおいて、これは"Compose(Alt+⇧+1)"になるかもしれない。ユーザーエージェントがキーを割り当てない場合、単に"Compose"になる。正確な文字列は割り当てられるアクセスキーが何であるか、およびどのようにユーザーエージェントがそのキーの組み合わせを表すかに依存する。
contenteditableコンテンツ属性Support in all current engines.
Global_attributes/contenteditable
Support in all current engines.
enctypeコンテンツ属性は、次のキーワードおよび状態をもつ列挙属性である:
| キーワード | 状態 | 概要 |
|---|---|---|
true | True | 要素は編集可能である。 |
false | False | 要素は編集可能でない。 |
plaintext-only | Plaintext-Only | 要素の生のテキストコンテンツのみが編集可能である。リッチフォーマットは無効になる。 |
この属性の欠損値のデフォルトおよび無効値のデフォルトは両方ともinherit状態である。継承状態は、親要素の状態に基づいて要素が編集可能である(または編集可能でない)ことを示す。The attribute's empty value default is the True state.
たとえば、ユーザーがHTMLを使用する記事を書くことが期待される、新しい記事を公開するためにformおよびtextareaを持つページを考えてみる:
< form method = POST >
< fieldset >
< legend > New article</ legend >
< textarea name = article > < p>Hello world.< /p></ textarea >
</ fieldset >
< p >< button > Publish</ button ></ p >
</ form > スクリプトを有効にする場合、textarea要素は、contenteditable属性を使用して、代わりにリッチテキストコントロールに置き換えることができる:
< form method = POST >
< fieldset >
< legend > New article</ legend >
< textarea id = textarea name = article > < p>Hello world.< /p></ textarea >
< div id = div style = "white-space: pre-wrap" hidden >< p > Hello world.</ p ></ div >
< script >
let textarea = document. getElementById( "textarea" );
let div = document. getElementById( "div" );
textarea. hidden = true ;
div. hidden = false ;
div. contentEditable = "true" ;
div. oninput = ( e) => {
textarea. value = div. innerHTML;
};
</ script >
</ fieldset >
< p >< button > Publish</ button ></ p >
</ form > たとえば挿入リンクを挿入する機能は、document.execCommand()APIを使用する、またはSelectionAPIおよび他のDOM APIを使用して実装することができる。[EXECCOMMAND] [SELECTION] [DOM]
contenteditable属性はまた、大きな効果を使用することができる:
<!doctype html>
< html lang = en >
< title > Live CSS editing!</ title >
< style style = white-space:pre contenteditable >
html { margin : .2 em ; font-size : 2 em ; color : lime ; background : purple }
head , title , style { display : block }
body { display : none }
</ style > element.contentEditable [ = value ]contenteditable属性の状態に基づいて、"true"、"plaintext-only"、"false"、または"inherit"を返す。
その状態を変更する設定が可能である。
新しい値がこれらの文字列のいずれかでない場合、"SyntaxError" DOMExceptionを投げる。
element.isContentEditable要素が編集可能な場合にtrueを返す。そうでなければfalseを返す。
designModeのゲッターおよびセッターdocument.designMode [ = value ]文書が編集可能である場合に"on"を返し、ない場合に"off"を返す。
文書の現在の状態を変更する設定が可能である。これは、文書をフォーカスし、その文書で文書の選択をリセットする。
著者は、もともと値'pre-wrap'へこれら編集のメカニズムを介して作成された編集ホストおよびマークアップ上の'white-space'プロパティを設定することを奨める。デフォルトのHTML空白処理は、あまりWYSIWYG編集に向かず、そして'white-space'がデフォルト値のままである場合、いくつかのコーナーの場合において、行の折り返しは正しく動作しない。
デフォルト'normal'値が代わりに使用される場合に発生する問題の例として、単語の間に2つのスペース(ここでは"␣"によって表される)とともに、"yellow␣␣ball"と入力したユーザーの場合を考える。'white-space'のデフォルト値('normal')のための場所での編集規則ともに、結果のマークアップは、"yellow ball"または"yellow ball"のいずれかで構成される。すなわち、2つの単語間の非開票スペースに加えて、通常スペースが存在する。'white-space'に対する'normal'値は共に相殺するために隣接する通常スペースを必要とするため、これは必要である。
前者の場合において、たとえ行の末尾で"yellow"単独で一致するとしても、"yellow⍽"は次の行("⍽"は非改行スペースを表すためにここで使用されている)に折り返す。後者の場合において、行の先頭に包まれる場合、"⍽ball"は非改行スペース由来の可視インデントを持つだろう。
しかし、'white-space'が'pre-wrap'に設定される場合、編集規則は、代わりに単に単語間に2つの通常のスペースを置き、2つの単語が行末で分割されるべきであり、スペースはレンダリングから削除されてきれいになる。
Support in all current engines.
spellcheck属性は、次のキーワードと状態を持つ列挙属性である:
| キーワード | 状態 | 概要 |
|---|---|---|
true | True | スペルおよび文法がチェックされる。 |
false | False | スペルおよび文法がチェックされない。 |
この属性の欠損値のデフォルトと無効値のデフォルトは、両方ともDefault状態である。デフォルト状態は、下記で定義されるように、おそらく親要素自身のspellcheck状態に基づいて、デフォルトの動作に応じて動作する要素であることを示す。The attribute's empty value default is the True state.
element.spellcheck [ = value ]要素がスペルや文法チェックを持つ場合はtrueを返す。そうでなければfalseを返す。
デフォルトを上書きしてspellcheckコンテンツ属性を設定するための、設定が可能である。
この仕様は、スペルや文法チェッカーに対するユーザーインターフェイスを定義しない。ユーザーエージェントはオンデマンドチェックを提供するかもしれず、チェックが有効である間に連続的なチェックを実行するかもしれず、または他のインターフェイスを使用するかもしれない。
ユーザーエージェントは、ユーザーがフォームコントロール(textarea要素など)または編集ホスト内の要素のいずれかの編集可能領域に入力するときに、書き込みの提案を提供する。
writingsuggestionsコンテンツ属性は、次のキーワードおよび状態をもつ列挙属性である:
| キーワード | 状態 | 概要 |
|---|---|---|
true | True | この要素については、書き込みの提案を行うべきである。 |
false | False | この要素については、書き込みの提案を行うべきでない。 |
この属性の欠損値のデフォルトは、Default状態である。デフォルト状態は、下記で定義されるように、おそらく親要素自身のwritingsuggestions状態に基づいて、デフォルトの動作に応じて動作する要素であることを示す。
The attribute's invalid value default and empty value default are both the True state.
element.writingSuggestions [ = value ]ユーザーエージェントが要素のスコープの下で書き込みの提案を行う場合は "true"を返し、そうでなければ "false"を返す。
デフォルトを上書きしてwritingsuggestionsコンテンツ属性を設定するための、設定が可能である。
User agents should only offer suggestions within an element's scope if the result of running the following algorithm given element returns true:
If the user has disabled writing suggestions, then return false.
If none of the following conditions are true:
element is an input element whose type attribute is in either the Text, Search, Telephone, URL, or Email state and element is mutable;
element is an editing host or is editable,
then return false.
If element has an inclusive ancestor with a writingsuggestions content attribute that's not in the Default and the nearest such ancestor's writingsuggestions content attribute is in the False state, then return false.
Otherwise, return true.
This specification does not define the user interface for writing suggestions. A user agent could offer on-demand suggestions, continuous suggestions as the user types, inline suggestions, autofill-like suggestions in a popup, or could use other interfaces.
モバイルデバイス上の仮想キーボードや音声入力など、テキストを入力するいくつかの方法では、文の最初の文字を自動的に大文字にすることでユーザーを支援することがある(この規則で言語でテキストを構成する場合)。自動大文字化を実装する仮想キーボードは、自動大文字にすべき文字を入力しようとするとき、大文字の文字を表示するように自動的に切り替えるかもしれない(ただし、ユーザーはその文字を小文字に切り替え可能である)。例えば音声入力など、他の入力の種類は、ユーザーが最初に介入するオプションを与えないような方法で自動大文字化を行ってもよい。autocapitalize属性は、著者がそのような振る舞いを制御するのを可能にする。
典型的に実装されるように、autocapitalize属性は、物理キーボードで入力するときの動作に影響しない。(この理由のために、場合によっては自動大文字化の動作を上書きしたり、最初の入力の後にテキストを編集することをユーザーの能力と同様に、属性をいかなる種類の入力検証にも当てにしてはならない。
ホストされている編集可能領域の自動大文字化動作を制御するために編集ホスト上で、その要素にテキストを入力するための動作を制御するためにinputもしくはtextarea要素の上で、またはform要素に関連付けられたすべての自動大文字化および自動修正継承要素のデフォルトの動作を制御するためにform要素上でautocapitalize属性を使用することができる。
autocapitalize属性は、type属性がURL、Email、またはPassword状態のいずれかにあるinput要素に対して、自動大文字化を有効にすることはない。
自動大文字化処理モデルは、次のように定義される5つの自動大文字化ヒントの中から選択することに基づく:
ユーザーエージェントおよび入力メソッドは、自動大文字化を有効にするかどうかを独自に決定すべきである。
自動大文字化は適用されるべきではない(すべての文字は小文字をデフォルトにすべきである)。
各文の最初の文字は大文字をデフォルトにすべきである。他のすべての文字は小文字をデフォルトにすべきである。
各単語の最初の文字は大文字をデフォルトにすべきである。他のすべての文字は小文字をデフォルトにすべきである。
全ての文字は大文字をデフォルトにすべきである。
Global_attributes/autocapitalize
Support in all current engines.
autocapitalize属性は、状態が可能な自動大文字ヒントである列挙属性である。属性の状態で指定された自動大文字化ヒントは、ユーザーエージェントの動作を通知する、使用済みの自動大文字化ヒントを形成するための他の考慮事項と組み合わされる。この属性のキーワードと状態マッピングは次のとおり:
| キーワード | 状態 |
|---|---|
off | None |
none | |
on | Sentences |
sentences | |
words | Words |
characters | Characters |
The attribute's missing value default is the Default state, and its invalid value default is the Sentences state.
element.autocapitalize [ = value ]要素の現在の自動大文字化状態を返す。設定されていない場合は空文字列を返す。form要素から状態を継承するinput要素とtextarea要素の場合、これはform要素の自動大文字化状態を返すが、編集可能領域の要素の場合、これは(この要素が実際に編集ホストでない限り)編集ホストの自動大文字化状態を返さないことに注意すること。
autocapitalizeコンテンツ属性を設定する(そしてそれによって要素の自動大文字化動作を変化させる)ことで、設定が可能である。
一部のテキスト入力方法は、入力中にスペルミスのある単語を自動的に修正することでユーザーを支援する。このプロセスは自動修正とも呼ばれる。ユーザーエージェントは、編集可能なテキストの自動修正を、フォームコントロール(textarea要素の値など)、または編集ホスト内の要素(contenteditableを使用するなど)でサポートできる。自動修正は、テキストが自動修正されようとしている、または自動修正されたことを示すユーザーインターフェイスを伴ってもよく、一般に、スペルミスのある単語の後に句読文字、スペース、または新しい段落を挿入するときに実行される。autocorrect属性は、著者にそのような動作を制御を可能にする。
ホストされている編集可能領域の自動大文字化動作を制御するために編集ホスト上で、その要素にテキストを入力するための動作を制御するためにinputもしくはtextarea要素の上で、またはform要素に関連付けられたすべての自動大文字化および自動修正継承要素のデフォルトの動作を制御するためにform要素上でautocapitalize属性を使用することができる。
type属性がURL、EmailまたはPasswordのいずれかの状態にあるinput要素ではautocorrect属性によって自動修正が有効になることはない。
autocorrect属性は、次のキーワードと状態を持つ列挙属性である:
| キーワード | 状態 | 概要 |
|---|---|---|
on | On | ユーザーエージェントは、ユーザーの入力中にスペルミスを自動的に修正することができる。左への入力中にスペルが自動的に修正されるかどうかは、ユーザーエージェントが決定するものであり、要素とユーザーの好みによって決まってもよい。 |
off | Off | ユーザーエージェントは、ユーザーの入力中にスペルを自動的に修正することはできない。 |
The attribute's invalid value default, missing value default, and empty value default are all the On state.
The autocorrect getter steps are: return true if the element's used autocorrection state is On and false if the element's used autocorrection state is Off. セッターステップ手順は次のとおり:指定した値がtrueの場合、要素のautocorrect属性を"on"に設定しなければならない。そうでなければ、"off"に設定しなければならない。
To compute the used autocorrection state of an element element, run these steps:
If element is an input element whose type attribute is in one of the URL, Email, or Password states, then return Off.
If the autocorrect content attribute is present on element, then return the state of the attribute.
If element is an autocapitalize-and-autocorrect inheriting element and has a non-null form owner, then return the state of element's form owner's autocorrect attribute.
Return On.
autocorrect要素の自動修正動作を返す。form要素から状態を継承する自動大文字化および自動修正の継承要素の場合、これはform要素の自動修正動作を返すが、編集可能領域内の要素の場合、編集ホストの自動修正動作は返さない(この要素が実際に編集ホストでない場合)。
autocorrect = valueautocorrectコンテンツ属性を更新する(そしてこれにより、要素の自動修正動作が変更される)。
input要素は、autocorrectコンテンツ属性を持たないため、"off"という属性を持つform要素から継承されるため、自動修正ができない。しかし、textarea要素は、値が"on"のautocorrectコンテンツ属性があるため、自動修正が可能である。
< form autocorrect = "off" >
< input type = "search" >
< textarea autocorrect = "on" ></ textarea >
</ form > inputmode属性ユーザーエージェントは、フォームコントロール(textarea要素の値など)で、または編集ホスト(contenteditableなど)における要素でinputmode属性をサポートすることができる。
Support in all current engines.
inputmodeコンテンツ属性は、ユーザーがコンテンツを入力する際に最も参考になる入力メカニズムの種類を指定する列挙属性である。
| キーワード | 説明 |
|---|---|
none | ユーザーエージェントは仮想キーボードを表示すべきではない。このキーワードは、独自のキーボードコントロールをレンダリングするコンテンツに役立つ。 |
text | ユーザーエージェントは、ユーザーのロケールでテキスト入力が可能な仮想キーボードを表示すべきである。 |
tel | ユーザーエージェントは、電話番号入力が可能な仮想キーボードを表示すべきであある。これは、数字0〜9、"#"文字、および"*"文字のキーを含むべきである。一部のロケールで、これはまた、アルファベットのニーモニックラベル(たとえば、米国で、"2"キーはまた、歴史的に文字A、B、およびCで標識されている)を含むことができる。 |
url | ユーザーエージェントは、"/"と"."文字、"www"や".com"のようなドメイン名の中で見つかった文字列を簡単に入力するための、URLの入力を補助するためのキーとともに、ユーザーのロケールでテキスト入力が可能な仮想キーボードを表示すべきである。 |
email | ユーザーエージェントは、"@"文字および"."文字のような、電子メールアドレスの入力を補助するためのキーとともに、ユーザーのロケールでテキスト入力が可能な仮想キーボードを表示すべきである。 |
numeric | ユーザーエージェントは、数字入力が可能な仮想キーボードを表示すべきであある。このキーワードは、PIN入力に便利である。 |
decimal | ユーザーエージェントは、小数入力が可能な仮想キーボードを表示すべきであある。ロケールの数値キーおよびフォーマットセパレーターを表示すべきである。 |
search | ユーザーエージェントは、検索に最適化された仮想キーボードを表示すべきである。 |
enterkeyhint属性ユーザーエージェントは、フォームコントロール(textarea要素の値など)で、または編集ホスト(contenteditableなど)における要素でenterkeyhint属性をサポートすることができる。
Global_attributes/enterkeyhint
Support in all current engines.
enterkeyhintコンテンツ属性は、仮想キーボードのEnterキーに表示するアクションラベル(またはアイコン)を指定する列挙属性である。これにより、ユーザーにとってより役立つようにするために、著者はEnterキーの表示をカスタマイズを可能にする。
| キーワード | 説明 |
|---|---|
enter | ユーザーエージェントは、典型的には新しい行を挿入する、操作'enter'の合図を提示すべきである。 |
done | ユーザーエージェントは、典型的には入力するものがもう何もなく、そして input method editor (IME)は閉じられることを意味する、操作'done'の合図を提示すべきである。 |
go | ユーザーエージェントは、典型的にはユーザーがタイプしたテキストのターゲットにユーザーを連れて行くことを意味する、操作'go'の合図を提示すべきである。 |
next | ユーザーエージェントは、典型的にはテキストを受け付ける次のフィールドにユーザーを連れて行く、操作'next'の合図を提示すべきである。 |
previous | ユーザーエージェントは、典型的にはテキストを受け入れる前のフィールドにユーザーを連れて行く、操作'previous'の合図を提示すべきである。 |
search | ユーザーエージェントは、典型的にはユーザーがタイプしたテキストの検索の結果にユーザーを連れて行く、操作「検索」の合図を提示すべきである。 |
send | ユーザーエージェントは、典型的にはテキストをそのテキストのターゲットに配信する、操作'send'の合図を提示すべきである。 |
このセクションは、ページ内検索を定義する。これは、ユーザーが特定の情報に対してページのコンテンツを検索できるようにする一般的なユーザーエージェントのメカニズムである。
ページ内検索機能へのアクセスは、ページ内検索インターフェイスを介して提供される。これはユーザーエージェントが提供するユーザーインターフェイスであり、ユーザーが入力と検索のパラメーターを指定できるようする。このインターフェイスは、ショートカットまたはメニュー選択の結果として表示される。
ページ内検索インターフェイスのテキスト入力と設定の組み合わせは、ユーザーのクエリーを表す。これは通常、ユーザーが検索したいテキストと、オプションの設定(例えば、検索を単語に限定する機能など)が含まれる。
ユーザーエージェントは、与えられたクエリーのページコンテンツを処理し、0個以上のマッチを識別する。これはユーザークエリーを満たすコンテンツ範囲である。
マッチの1つがアクティブなマッチとしてユーザーに識別される。 それはハイライトされ、スクロールして表示される。ユーザーは、ページ内検索インターフェイスを使用してアクティブなマッチを前進させることにより、マッチをナビゲートできる。
Issue #3539は、ページ内検索が現在指定されていないwindow.find() APIの基礎となる方法の標準化を追跡する。
ページ内検索が一致するものの検索を開始するとき、 属性が設定されていないページ内のすべての要素は、ページ内検索が検索できるようにするために、属性を変更せずに、2番目のスロットのにアクセスできるようにすべきである。同様に、状態の属性をもつすべてのHTML要素は、ページ内検索で検索できるようにするために、属性を変更せずににアクセスできるようにすべきである。ページ内検索が一致の検索を終了した後、要素と、状態の属性をもつ要素は、コンテンツが再びスキップされるようにすべきである。このプロセス全体は同期的に行われなければならない(したがって、ユーザーや著者のコードを監視することはできない)。[CSSCONTAIN]
When find-in-page chooses a new , perform the following steps:
Let node be the first node in the .
Queue a global task on the user interaction task source given node's relevant global object to run the ancestor revealing algorithm on node.
このようにページ内検索が要素を自動展開すると、イベントが発火する。ページ内検索が起動する別のイベントと同様に、このイベントは、ユーザーがページ内検索のダイアログに入力している内容を検出するためにページによって使用される。ページが、現在の検索語と、ユーザーが入力できるすべての次の文字をギャップで区切った小さなスクロール可能領域を作成し、ブラウザがどの文字にスクロールするかを観察した場合、その文字を検索語に追加し、スクロール可能領域を更新して、検索語を段階的に構築できる。考えられる次のマッチをそれぞれ閉じた要素でラップすることで、ページはイベントではなくイベントをリッスンすることができる。この攻撃は、ユーザーがページ内検索ダイアログに入力したすべての文字に作用しないことによって、両方のイベントに対して対処することができる。
ページ内検索プロセスは、文書のコンテキストで呼び出され、その文書の選択に影響を与えることがある。 具体的には、アクティブなマッチを定義する範囲が、現在の選択を決定することがある。しかし、この選択の更新は、ページ内検索プロセスのさまざまな時点で発生することがある(たとえば、ページ内検索インターフェイスの終了時、またはアクティブなマッチの範囲の変更時)。
実装で定義された(そしておそらくデバイス固有の)方法で、ユーザーはユーザーエージェントに閉じ要求を送ることができる。これは、ユーザーが、ポップオーバー、メニュー、ダイアログ、ピッカー、表示モードなど、現在画面に表示されているものを閉じたいことを示す。
閉じ要求の例を次に示す:
デスクトッププラットフォームのEscキー。
Androidなどの特定のモバイルプラットフォームでの戻るボタンまたはジェスチャー。
iOS VoiceOverの2本指スクラブ"z"ジェスチャーなど、支援技術の取り消しジェスチャー。
DualShockゲームパッドの丸ボタンなど、ゲームコントローラーの標準的な"戻る"ボタン
Escキーを押すことが閉じ要求として解釈されるプラットフォームでは、ユーザーエージェントは、キーが押されているdownを、キーが離されているのではなく、閉じ要求としなければならない。したがって、上記のアルゴリズムでは、発生する"関連イベント"は単一のkeydownイベントでなければならない。
Escが閉じ要求であるプラットフォームでは、ユーザーエージェントはまず、適切に初期化されたkeydownイベントを発火する。ウェブ開発者がpreventDefault()を呼び出してイベントをキャンセルした場合、それ以降は何も起こらない。しかし、イベントがキャンセルされずに発生した場合、ユーザーエージェントはクローズウォッチャーの処理に進む。
戻るボタンが潜在的閉じ要求であるプラットフォームでは、イベントは関係しないため、戻るボタンが押されると、ユーザーエージェントは直接クローズウォッチャー の処理に進む。アクティブなクローズウォッチャーが存在する場合、それがトリガーされる。存在しない場合、ユーザーエージェントは、別の方法で、例えば、-1のデルタによる履歴のトラバース要求として、戻るボタンの押下を解釈することができる。
CloseWatcherインターフェイスwatcher = new CloseWatcher()watcher = new CloseWatcher({ signal })新しいCloseWatcherインスタンスを作成する。
signalオプションが与えられる場合、与えられたAbortSignalをアボートすることで、watcherを破棄できる(あたかもwatcher.destroy()のように)。
いずれかのclose watcherがすでにアクティブであり、かつWindowがhistory-action activationを持たない場合、結果として生じるCloseWatcherは、close requestに応答して、すでにアクティブなclose watcherとともに閉じられる。(このすでにアクティブなclose watcherは、必ずしもCloseWatcherオブジェクトである必要はない。モーダルdialog要素、またはpopover 属性をもつ要素によって生成されたポップオーバーである可能性がある。)
watcher.requestClose()最初にcancelイベントを発火させ、かつそのイベントがpreventDefault()でキャンセルされない場合、あたかもwatcher.destroy()が呼び出されたかのように閉じたウォッチャを非アクティブ化する前にcloseイベントを発火させる。これにより、あたかもclose requestがwatcherをターゲットとして送信されたかのように動作する。
これは、キャンセルおよびクローズロジックをcancelおよびcloseイベントハンドラーに統合するために使用できるヘルパーユーティリティであり、非close requestのすべてのクローズアフォーダンスでこのメソッドを呼び出すことができる。
watcher.close()即座にcloseイベントを発火させ、 あたかもwatcher.destroy()が呼び出されたかのようにクローズウォッチャーを停止させる。
これは、cancelイベントハンドラー内のロジックをスキップして、 closeイベントハンドラーへの終了ロジックをトリガーするために使用できるヘルパーユーティリティである。
watcher.destroy()watcherを停止させ、closeイベントを受け取らないようにし、新しい独立したCloseWatcherインスタンスを構築できるようにする。
これは、関連するUI要素が閉じられる以外の方法で分解された場合に呼び出されることを目的とする。
下記は、CloseWatcherインターフェイスを実装するすべてのオブジェクトによって、イベントハンドラーIDL属性として、サポートされるイベントハンドラー(および対応するイベントハンドラーイベント型)である:
| イベントハンドラー | イベントハンドラーイベント型 |
|---|---|
oncancel | cancel |
onclose | close |
ユーザーが指定した閉じる要求と閉じるボタンが押されたときに自動的に閉じるカスタムピッカーコントロールを実装する場合、次のコードは、CloseWatcher APIを使用して閉じる要求を処理する方法を示す:
const watcher = new CloseWatcher();
const picker = setUpAndShowPickerDOMElement();
let chosenValue = null ;
watcher. onclose = () => {
chosenValue = picker. querySelector( 'input' ). value;
picker. remove();
};
picker. querySelector( '.close-button' ). onclick = () => watcher. requestClose(); 選択された値を収集するためのロジックが、CloseWatcherオブジェクトの closeイベントハンドラーに集中されていることに注意する。閉じるボタンのclickイベントハンドラーは、requestClose()を呼び出すことによって、そのロジックに委任される。
CloseWatcherオブジェクトのcancelイベントを使用すると、closeイベントの発火およびCloseWatcherの破棄を防ぐことができる。一般的な使用例を次に示す:
watcher. oncancel = async ( e) => {
if ( hasUnsavedData && e. cancelable) {
e. preventDefault();
const userReallyWantsToClose = await askForConfirmation( "Are you sure you want to close?" );
if ( userReallyWantsToClose) {
hasUnsavedData = false ;
watcher. close();
}
}
}; 不正使用防止のため、このイベントは、ページにhistory-action activationがある場合にのみ cancelableになる。これは、指定された閉じる要求の後に失われる。これにより、ユーザーによるアクティブ化が介在しない状態でユーザーが閉じる要求を2回続けて送信した場合、要求は確実に成功する。2回目の要求は、cancelイベントハンドラーによるpreventDefault()の呼び出し試行を無視し、CloseWatcherの終了に進む。
上記の2つの例を組み合わせると、requestClose()と close()の違いがわかる。閉じるボタンのclickイベントハンドラーでrequestClose()を使用したので、そのボタンをクリックするとCloseWatcherのcancelイベントがトリガーされ、保存されていないデータがある場合はユーザーに確認を求める可能性がある。close()を使用した場合、このチェックはスキップされる。これが適切な場合もあるが、通常はrequestClose()の方が、ユーザーがトリガーする閉じる要求に適している。
cancelイベントに対するuser activation制限に加えて、 CloseWatcher構成物のためのより巧妙な形式のユーザーアクティベーションゲーティングがある。ユーザーがアクティブ化せずに複数CloseWatcherを作成した場合、新しく作成されたものは、最後に作成されたもの close watcherと一緒にグループ化されるため、1つの閉じ要求で両方が閉じられる:
window. onload = () => {
// This will work as normal: it is the first close watcher created without user activation.
( new CloseWatcher()). onclose = () => { /* ... */ };
};
button1. onclick = () => {
// This will work as normal: the button click counts as user activation.
( new CloseWatcher()). onclose = () => { /* ... */ };
};
button2. onclick = () => {
// These will be grouped together, and both will close in response to a single close request.
( new CloseWatcher()). onclose = () => { /* ... */ };
( new CloseWatcher()). onclose = () => { /* ... */ };
}; つまり、 destroy()、close()またはrequestClose()を適切に呼び出すことが重要である。そうすることが、グループ化されていない「フリー」のクローズウォッチャースロットを取り戻す唯一の方法である。ユーザーのアクティブ化なしに作成されたこのようなクローズウォッチャーは、セッションの非アクティブタイムアウトダイアログや、ユーザーのアクティブ化に応答して生成されないサーバートリガーイベントの緊急通知などの場合に役立つ。